
Bird proofing is one of the most effective ways to stop pigeons nesting under solar panels.
When installed properly using the right materials, it can provide a long-term solution to a problem that otherwise tends to get worse over time.
Unfortunately, not all bird proofing installations are created equal.
Over the years, we’ve inspected plenty of systems across Brisbane, Ipswich, Redlands and the Gold Coast that looked fine from the ground but had serious problems once we got up on the roof.
Some used poor-quality materials.
Others were installed incorrectly.
And in many cases, the pigeons had already found a way back in.
If you’re considering bird proofing your solar panels, here are some of the most common mistakes we see and how to avoid them.
Why Bird Proofing Sometimes Fails
Many homeowners assume that if mesh has been installed around the solar panels, the problem should be solved.
But bird proofing is only effective when:
- The correct materials are used
- The installation is completed properly
- Every access point is closed
If even one of these elements is missed, pigeons often find a way back underneath the panels.
And once they do, the nesting cycle usually starts all over again.
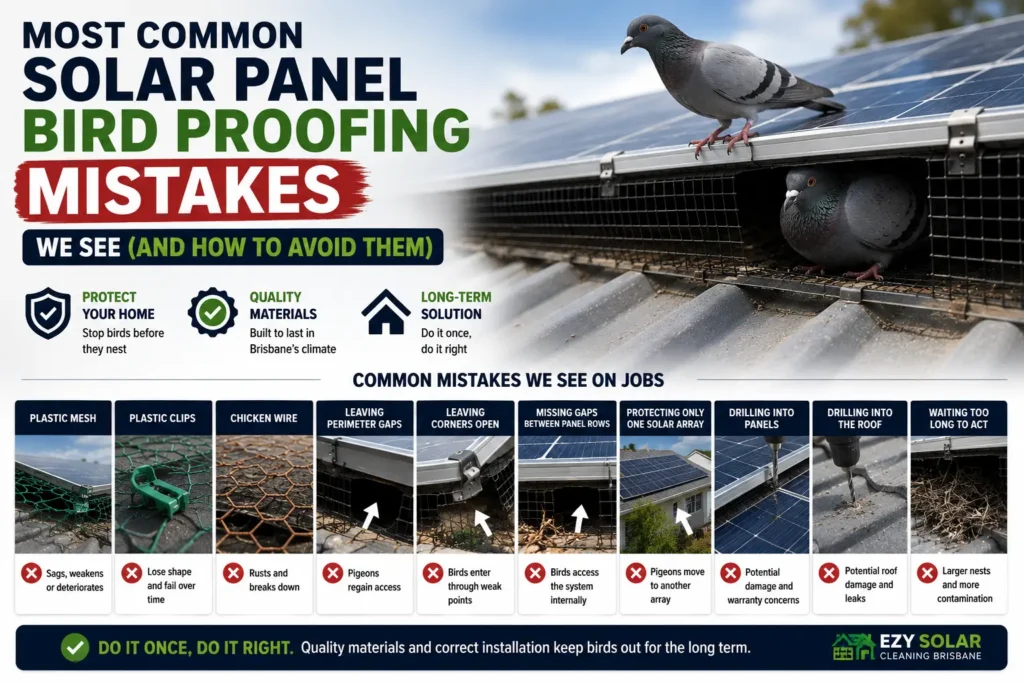
Comparison Table: Common Bird Proofing Mistakes And Their Consequences
The table below summarises some of the most common mistakes we encounter and what typically happens as a result.
| Mistake | Common Result |
|---|---|
| Plastic mesh | Sags, weakens or deteriorates |
| Plastic clips | Lose shape and fail over time |
| Chicken wire | Rusts and breaks down |
| Leaving perimeter gaps | Pigeons regain access |
| Leaving corners open | Birds enter through weak points |
| Missing gaps between panel rows | Birds access the system internally |
| Protecting only one solar array | Pigeons move to another array |
| Drilling into panels | Potential damage and warranty concerns |
| Drilling into the roof | Potential roof damage and leaks |
| Waiting too long to act | Larger nests and more contamination |
Many of these mistakes are completely avoidable with proper planning and installation.
Mistake #1: Using Plastic Mesh
This is probably one of the most common DIY mistakes we see.
At first glance, plastic mesh seems like a sensible option because it’s:
- Cheap
- Lightweight
- Easy to find
The problem is that Brisbane roofs get extremely hot.
Over time, plastic mesh can:
- Soften
- Sag
- Become brittle
- Lose its shape
We’ve seen installations where plastic mesh was only around a year old and was already starting to fail.
In several cases, pigeons had simply pushed through weakened sections and regained access underneath the panels.
We discuss suitable materials in more detail in What Is The Best Mesh For Solar Panel Bird Proofing?
Mistake #2: Using Plastic Or Nylon Clips
Even if the mesh is decent quality, the clips matter too.
We’ve seen homeowners use:
- Plastic clips
- Nylon clips
- Generic fasteners
These products often suffer from the same problems as plastic mesh.
After prolonged exposure to:
- Heat
- UV
- Weather
they can become weak, flexible and brittle.
Once that happens, sections of mesh may loosen or detach completely.
Mistake #3: Using Chicken Wire
Another common DIY solution is standard chicken wire.
Many people assume that if it keeps chickens inside a coop, it should work for bird proofing.
Unfortunately, that’s rarely the case.
We’ve inspected bird proofing systems where chicken wire had:
- Rusted heavily
- Lost strength
- Broken apart
- Started staining surrounding roof surfaces
In some situations, corrosion from poor-quality wire had already begun affecting nearby areas.
Mistake #4: Not Enclosing The Entire Perimeter
This is probably the most common installation mistake we encounter.
Some homeowners only install mesh:
- Along the sides
- Across the front
- At the top and bottom
while leaving other sections exposed.
Unfortunately, pigeons only need one access point.
If part of the perimeter remains open, they will often find it.
We’ve seen many installations where most of the work was done correctly, but a single unprotected section allowed birds to continue nesting underneath the panels.
Mistake #5: Leaving Corners Open
Corners are another area where problems often occur.
Bird proofing mesh may appear secure when viewed from a distance, but if corners aren’t properly sealed, pigeons can squeeze through surprisingly small gaps.
We’ve seen many failed installations where the perimeter looked complete until a closer inspection revealed open corners.
Those small gaps were all the pigeons needed.
Mistake #6: Missing Gaps Between Solar Panel Rows
This is one of the mistakes that inexperienced installers often miss.
Many solar systems have multiple rows of panels.
In an ideal installation, the rows sit very close together.
However, we’ve seen plenty of systems where a gap has formed between panel rows.
When this happens, simply bird proofing the outer perimeter may not be enough.
The pigeons can enter through the internal gap between the rows.
We’ve encountered this issue many times.
The perimeter was fully enclosed, yet the birds continued returning because the installer failed to close the gap between the panel groups.
Mistake #7: Only Protecting The Area Where Birds Are Currently Nesting
This is another very common mistake.
Imagine a home with:
- One solar array on the main roof
- Another solar array above the garage
The pigeons are nesting under the main roof array.
Many homeowners assume they only need to bird proof that section.
The problem is that pigeons are extremely location-oriented.
If access is blocked to one array, they often move to another array on the same property.
We’ve seen this happen repeatedly.
This is why we generally recommend protecting all solar panel groups rather than only the one currently being used.
This behaviour is explained further in Can Pigeons Come Back After Solar Panel Bird Proofing?
Mistake #8: Drilling Into Solar Panels
We’ve occasionally seen people attempt to secure mesh by drilling directly into the solar panel frame or nearby components.
This is not something we recommend.
Bird proofing systems should be designed to attach using specialised mounting clips without modifying the solar panels themselves.
Drilling can potentially create unnecessary risks and complications.
Mistake #9: Drilling Into The Roof
Another mistake is attaching bird proofing materials directly into the roof structure.
Besides being unnecessary, it may create future issues such as:
- Roof damage
- Water ingress
- Additional maintenance concerns
A properly designed bird proofing system should not require drilling into the roof.
Mistake #10: Waiting Too Long To Deal With The Problem
Not every bird proofing mistake involves installation.
One of the biggest mistakes we see is simply waiting too long.
Homeowners often think:
- It’s only one or two pigeons
- They’ll leave eventually
- The problem isn’t serious
But most major infestations start exactly that way.
Over time, those few pigeons can become:
- Larger nests
- More droppings
- Blocked gutters
- Increased roof contamination
We’ve seen problems grow significantly in only a matter of months.
This is one reason we always encourage homeowners to investigate signs of nesting early.
Our guide on How To Tell If Birds Are Nesting Under Your Solar Panels explains what to look for.
Why Prevention Is Better Than Repair
One thing we’ve learned after years of dealing with pigeon problems is that prevention is usually much easier than cleanup.
Once birds become established underneath the panels, the job often involves:
- Nest removal
- Cleaning
- Contamination management
- Bird proofing installation
Compared to simply preventing access in the first place.
That’s why many homeowners choose solar panel bird proofing before a small problem turns into a major one.
Final Thoughts
Most failed bird proofing systems don’t fail because bird proofing doesn’t work.
They fail because of:
- Poor materials
- Installation shortcuts
- Missed access points
- Delayed action
Over the years we’ve seen plastic mesh fail, chicken wire rust away, corners left open and entire panel groups left unprotected.
The good news is that all of these mistakes are avoidable.
Using quality materials, proper installation methods and addressing the entire solar system can dramatically improve the long-term success of bird proofing.
Frequently Asked Questions
What is the most common bird proofing mistake?
One of the most common mistakes is failing to fully enclose the entire solar panel perimeter, leaving access points for pigeons.
Does plastic bird proofing mesh work?
It may work temporarily, but plastic mesh often deteriorates, softens or sags when exposed to Brisbane’s heat and UV conditions.
Why is chicken wire not recommended?
Chicken wire can rust, weaken and deteriorate over time, especially when exposed to weather conditions on rooftops.
Do corners need to be bird proofed?
Yes. Even small openings in corners can allow pigeons to access the space underneath the solar panels.
Should all solar panel arrays be protected?
In most cases, yes. Protecting only one panel group may simply encourage pigeons to move to another array on the same property.
Can pigeons get through small gaps?
Yes. Pigeons are surprisingly good at finding and exploiting small openings in bird proofing systems.
Should bird proofing be attached by drilling into the roof?
Generally no. Proper bird proofing systems should not require drilling into the roof structure.
What’s the best material for solar panel bird proofing?
Based on our experience, PVC-coated stainless steel mesh provides the best combination of durability, strength and weather resistance.