If pigeons are nesting under your solar panels, one of the first questions you’ll probably ask yourself is:
“Should I try to bird proof it myself, or should I hire a professional?”
And honestly, the answer depends on:
- your roof
- your experience
- how bad the nesting problem already is
- and how confident you are working around solar panels at height
Over the years, we’ve seen homeowners successfully install DIY bird proofing kits on simple single-storey homes.
We’ve also seen plenty of failed DIY attempts that ended up costing more to fix later.
In this guide, we’ll break down the real differences between DIY and professional solar panel bird proofing based on what we actually see across Brisbane homes every week.
Can You DIY Solar Panel Bird Proofing?
Yes — technically, you can.
There are DIY bird proofing kits available online, and for some homeowners, they can work reasonably well when installed properly.
DIY bird proofing is usually more realistic when:
- the home is single-storey
- the roof pitch is fairly flat
- the solar panel layout is simple
- there’s no existing nesting yet
- the homeowner is experienced and comfortable working on roofs
If it’s simply a preventative installation before pigeons move in, DIY can sometimes be a reasonable option.
But once you start dealing with:
- active nesting
- steep roofs
- complicated panel layouts
- large systems
- difficult corners
- heavy debris build-up
…the job becomes much harder than most people expect.
The Biggest DIY Mistakes We See
One of the most common problems is homeowners using the wrong materials.
We regularly see:
- chicken wire
- plastic mesh
- cat guard mesh
- cheap hardware-store materials
being installed under solar panels.
The issue is that Brisbane weather is brutal on cheap plastic materials.
Over time:
- the sun weakens the mesh
- the plastic becomes brittle
- holes appear
- pigeons get straight back underneath
We’ve even seen old plastic mesh start disintegrating underneath the solar panels, turning the cleanup into a much bigger job later.
Another common issue is improper fastening.
Some DIY installations use:
- zip ties
- metal wire
- silicone
- screws
- bolts drilled into the roof or panels
This can create major problems.
Drilling into the solar panels can void manufacturer warranties, and drilling into roofing can increase the risk of leaks and roof damage, which is why many homeowners choose professional solar panel bird proofing instead.
Gaps Are Harder Than They Look
A lot of homeowners think bird proofing is simply:
“attach mesh around the edges.”
But real solar systems are rarely that simple.
Many Brisbane homes have:
- unusual panel layouts
- roof corners
- skylights
- ventilation pipes
- narrow access areas
- mounting brackets in awkward spots
Professionally installing bird proofing mesh means properly working around all those obstacles while still fully sealing the gap underneath the panels.
One small gap is all pigeons need.
This is one of the biggest reasons DIY installations fail long-term.
We often see:
- corners left open
- weak spots around brackets
- loose sections of mesh
- poorly tensioned mesh sagging over time
And once birds discover an entry point, they’ll usually keep coming back, which is why properly stopping pigeons on solar panels requires all gaps to be sealed properly.
Real Example of a Failed DIY Installation
We recently worked on a home where the owner had already attempted DIY bird proofing themselves.
They installed plastic mesh and drilled it directly into the roof.
At first, it seemed to work.
But after long exposure to Brisbane sun and weather:
- the plastic mesh became brittle
- cracks formed
- holes opened up
- the pigeons got straight back underneath
The old mesh then started breaking apart underneath the panels, creating an even bigger cleanup problem.
Before we could properly install new bird proofing mesh, we first had to:
- remove the failed DIY setup
- clean all the old debris
- clear out the nesting material
- remove damaged sections
In situations like this, homeowners often end up paying:
- for the original DIY materials
- for their own time
- and then for professional repairs afterward anyway
Safety Is a Bigger Issue Than Most People Realise
This is probably the biggest reason many homeowners eventually decide not to DIY the job themselves.
Bird proofing solar panels isn’t like mowing the lawn or doing small garden maintenance.
You’re working:
- at height
- around electrical systems
- on steep roofing
- often in very hot conditions
Even ladder setup alone can become dangerous if it’s not done properly.
Professional installers use:
- secured ladders
- ladder stabilisers
- harness systems
- roof safety equipment
- proper roof access procedures
We also regularly work on:
- steep Colorbond roofs
- fragile tiled roofs
- terracotta roofs that crack easily
A lot of DIY homeowners underestimate how difficult it is to safely move around a roof while carrying:
- mesh
- tools
- clips
- ladders
- cleaning equipment
And obviously, the biggest risk is simply falling off the roof.
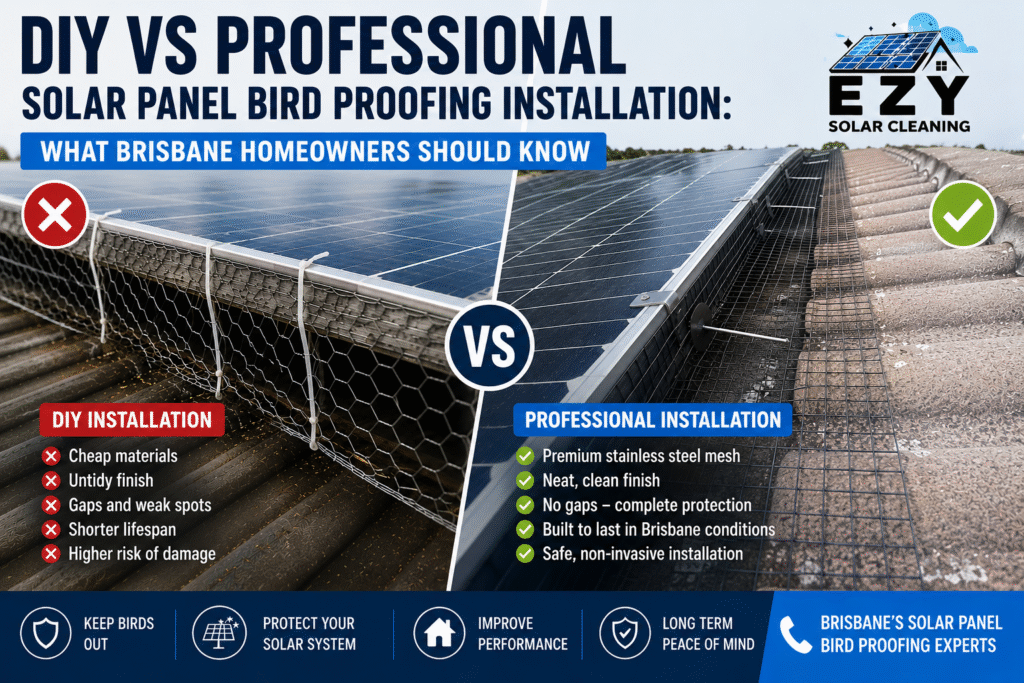
Professional Installation vs DIY Materials
One of the biggest differences between DIY and professional bird proofing is the quality of the materials used.
Professional installations normally use:
- stainless steel mesh
- UV-resistant coatings
- solar-safe clips
- non-drilling attachment systems
At EZY Solar Cleaning, we use:
- PVC-coated stainless steel mesh
- aluminum solar clips
- non-invasive installation methods
This allows the mesh to attach safely to the solar panel frame without drilling into the roof or the panels themselves.
The end result:
- looks neater
- lasts much longer
- stays properly tensioned
- handles Brisbane weather better
- provides stronger long-term protection
Most homeowners are actually surprised by how neat professional bird proofing looks from the ground once it’s finished.
What Homeowners Usually Notice After Professional Bird Proofing
One thing we hear all the time is:
“I didn’t realise how much mess was actually under there.”
Once the nests, droppings, and debris are removed, many homeowners are shocked by how much material had built up underneath the panels.
Many homeowners also combine bird proofing with solar panel cleaning to remove droppings, debris, and contamination left behind underneath the system.
- cleaner-looking panels
- less mess around the property
- quieter mornings
- fewer pigeons hanging around
- improved system cleanliness
Some homeowners also report better solar performance afterward, especially when heavy droppings and grime have built up over time, which we discussed further in our guide on whether dirty solar panels really lose efficiency
When Professional Bird Proofing Is Usually the Better Option
Professional installation is normally the safer and better long-term option when:
- the roof is steep
- the home is double-storey
- birds are already nesting
- the panel layout is complicated
- the homeowner isn’t comfortable working at height
- warranty-safe installation matters
Most people who choose professional installation simply don’t want to risk:
- falling off the roof
- damaging tiles
- damaging the panels
- voiding warranties
- wasting money on failed DIY attempts
And honestly, that’s understandable.
Is DIY Bird Proofing Ever Worth It?
If someone is:
- experienced
- handy
- comfortable on roofs
- using proper materials
- installing it safely
…DIY bird proofing can absolutely save money.
But the key is doing it properly.
The biggest advice we’d give homeowners is:
- never drill into the panels
- never drill into the roof unnecessarily
- don’t improvise with random materials
- avoid cheap plastic mesh
- use a proper bird proofing kit
- prioritise safety above everything else
And if you’re not fully comfortable working on roofs, it’s usually smarter to leave it to professionals.
Final Thoughts
At the end of the day, the real difference between DIY and professional bird proofing is usually:
- appearance
- durability
- warranty protection
- workmanship
- and long-term reliability
DIY can absolutely save money if it’s done properly.
But if it’s done badly, homeowners often end up paying twice:
once for the failed DIY attempt, and again to have it professionally corrected later.
Professional bird proofing typically gives homeowners:
- a cleaner finish
- stronger materials
- safer installation
- proper roof access
- warranty-backed work
- and long-term peace of mind
And honestly, bird proofing solar panels probably isn’t the kind of job most people should randomly tackle on a Sunday afternoon after a few beers.
Frequently Asked Questions
Can I install solar panel bird proofing myself?
Yes, some homeowners successfully install DIY bird proofing kits, especially on simple single-storey homes. The key is using proper materials and staying safe while working on the roof.
Does DIY bird proofing void solar panel warranties?
It can if the panels are drilled into or damaged during installation. That’s why professional systems typically use non-invasive attachment methods.
What mesh is best for solar panel bird proofing?
Stainless steel mesh with UV-resistant coating is generally the most durable long-term option for Brisbane conditions.
Why do DIY bird proofing jobs fail?
The most common reasons are:
- cheap materials
- poor fastening
- gaps left open
- weak mesh
- poor workmanship
- sun damage to plastic products
Is professional bird proofing worth it?
For many homeowners, professional installation is worth it — especially on double-storey homes or roofs with active nesting problems — which is why many Brisbane homeowners research whether solar panel bird proofing is worth it before deciding between DIY and professional installation.